Tardis Bookshelf - By Mark Stephens
A cellphone-controlled Tardis bookshelf with light and sounds.
The Project
This was a project I built with my 15-year old daughter, who's a VERY big Dr Who fan. It started out with the need for a night light. And of course it would need a microcontroller ;-)
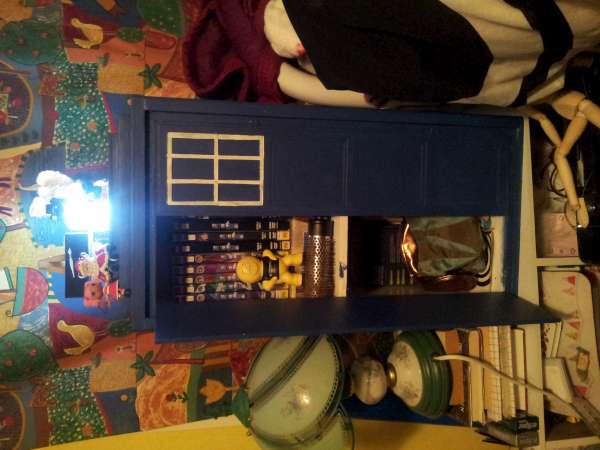
First we did the mechanical build, which started with a 2-cube bookshelf from the Warehouse for about $25. We got various bits of wood cut to size for the vertical edges, the top and the doors, which were attached with small hinges. The door and side 3D appearance were achieved with carefully cut cardboard layers on top of the wood, and then painted with a Tardis blue acrylic paint. The top is 3 layers of wood, and is hollow for the electronics.
The circuit is based around an Arduino board, which has the following hardware attached to it:
* input is via a little bluetooth-to-serial board I had lying around. This was mounted on the inside top of the shelf. This takes basic ASCII-encoded strings via a bluetooth app (downloadable of Android market for free), and interfaces with the Arduino via the serial connection.
* an SD card shield with prototyping area was used to provide sound storage. The SD card was loaded with a bunch of low bitrate (8kpbs mono) sound samples, such as a Dalek "exterminate", the Tardis wheezing sound, and a couple of Dr Who quotes. It also includes the "double rainbow" quote, and the nyan cat music, because you can never get enough nyan cat.
* A D/A converter, built on the prototyping area. This was a little unusual in construction, achieved using a 74HC595 serial to parallel shift register, and a R-2R resistor ladder to convert the 8-bit digital shift register output to an analog audio signal. This technique was used to minimise the code, clock cycles and pins required on the Arduino, especially given other things it's driving.
* a pre-fab mono amp was connected to the D/A output, and in turn attached to a speaker mounted on the rear of the shelf. Use of this component minimised further circuitry and reduced space. With an added bonus that I have a poor track record building analog circuits :-)
* a cluster of 30-odd super bright white LEDs, arranged in 3 concentric rings. These were mounted at the top and form the Tardis light. They are covered by a diffuse plastic container (actually a baby's drinking bottle we found at the supermarket, cut to size and sanded to make diffuse) Each of the 3 rings is connected to an Arduino output pin via a TIP31 power transistor (too much current for an Arduino pin), and the code drives each independently using PWM. This means it can achieve different lighting effects (while playing sounds)
The whole thing is powered by a 5V power pack.
After wiring it all up, we went through the process of systematically constructing the control software. The code includes a comment of the mode strings it looks for, and the lighting and sound effects for each mode.
It now sits beside her bed.
Code and documentation can be found here: https://github.com/mrmorphic/tardis<br><br>Things of interest in the code:<br>*The code is commented to show pin assignments, in case you want to build something like this yourself.<br>*For speed, the sound output routine doesn't use digitalWrite, but:<br><br>#define CLEAR_PIN(port,pin)(port&=(~(1<
<pin>#define SET_PIN(port,pin)(port|=(1<
<pin><br>This controls the pins directly, but only works forArduino port D, which from memory are digital pins 0 to 7.</pin></pin>