We are extremely passionate about sharing educational 3D printing resources and information. Today we have a simple guide from PrintLab on how to design and 3D print your very own chemical structures. From Water and Caffeine to medicines and engineering materials, chemistry plays a key part in everything we do and using this guide you can 3D print any chemistry model you wish with ease:
Step 1) Obtaining a Molecule
If you have a molecule in mind that you wish to print then you can either download the Protein Data Bank file (PDB) from the internet by searching ‘<molecule name> PDB file’. Alternatively you can draw/model the molecule you wish to print. We recommend modelling, especially within an educational environment as it is an effective tool for learning about molecular geometry.
For modelling molecules, a useful software programme is MoluCad. It is available to download for free and is easy to use.
Feel free to play around with various elements before drawing in your chosen atoms and bonds. If you have opted to download a molecule from the internet rather than model one then we still suggest importing into MoluCad (File -> Import -> Protein Data Bank File). Although PDB files can be imported directly into blender (Next step), we found that in some cases the atoms are loaded without the presence of bonds, whereas importing the PDB file into MoluCAD assists in generating coordinates for the bonds. Once the PDB file has been drawn or imported simply export the file (File -> Export -> Protein Data Bank File).

Step 2) Manipulating the Molecule
The next step is to manipulate the PDB file and convert to an object file (OBJ). An OBJ defines the geometry as well as other properties. To edit and convert the PDB file initially created you can use a free software called Blender. Once downloaded you will also want to download an add-on called ‘Atomic Blender’ which allows the user to import PDB files. Details and download link for the add-on can be found here;
http://wiki.blender.org/index.php/Extensions:2.6/Py/Scripts/Import-Export/Atomic_Blender_Panel
After successfully installing the add-on you can then import your PDB file (File -> Import -> Protein Data Bank File) and whilst doing so change the scaling of the molecule i.e. bond radius, scale of atom radii and distance between bonds;
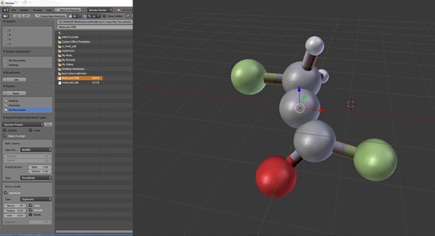
Once you are happy with your Molecular model, simply export as an OBJ file. (File -> Export -> Protein Data Bank File).
Step 3) Printing the Molecule
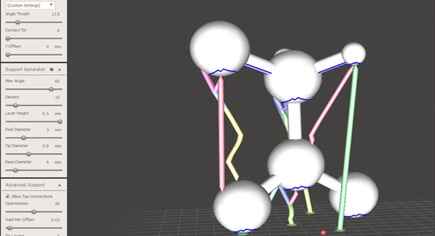
Since you are now comfortable with the scaling of your molecule and it is saved as an OBJ file, you are now able to 3D print the file. Depending on both the geometry and the complexity of the molecule you may have to use a support structure in order to 3D print the molecule. In most cases, support is required. A useful software for generating support is Meshmixer which can be downloaded for free online. Not only does it generate support, but it also allows the user to delete or input extra support and thus tailor to your specific needs. It is also useful for repositioning and scaling the molecule which are important considerations when looking at appropriate support structures. If you want to learn how to use Meshmixer and all of its tools, we offer an award winning course. You can find information on this as well as other courses around 3D design and 3D printing here.
Once complete, choose to export as an STL and you have your finished 3D Printable Molecule!
For lots of other free resources, including guides, tips and educational lesson plans sign up today here. There is no catch and sign up is fast, secure and simple.